How to repair your broken iPhone 6s plus lcd screen by yourself?
Symptoms :
- broken, cracked LCD screen
- defective pixels
- fade colors
- black or white screen
- Splash screen
- No touch...
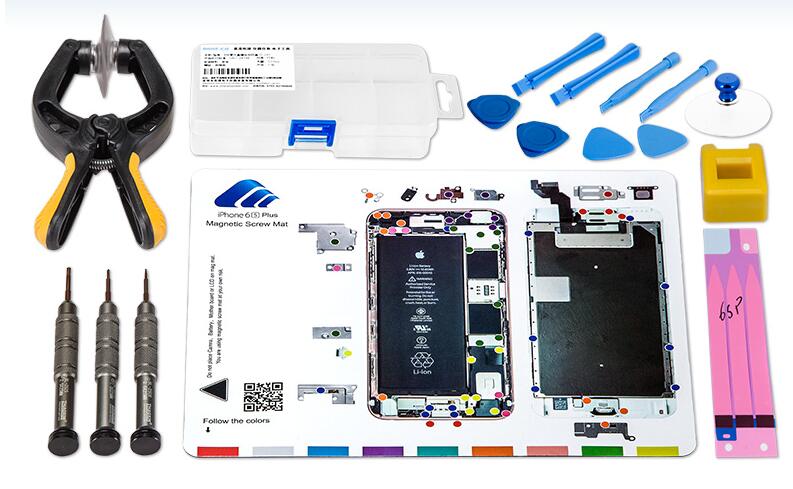
Recommended repair kit :
- iPhone 6s plus New OEM or Original black or white screen
- Suction cups
- Tweezers
- Phillips screwdriver
- Pentagonal screwdriver
- Spudger
- Blade

if you have prepare this tools and a new LCD, you can begin, and follow below steps:
Step 1
Before disassembling the LCD screen of your iPhone 6S Plus, you have to securely turn it off.
Maintain the power button on the top for a few seconds.
Step 2
The iPhone 6s plus SIM card tray is on the right side of the phone, near the power button (on/off/sleep)
Insert theSIM card tray eject tool in the small hole (circled in red on the first picture) and push to eject the SIM card tray.

Step 3
With a pentalobe screw driver, remove the two screws circled in red on the picture.
Those screws are on both side of the lightning connector of the phone.

Step 4
Then put the Suction cups on the iPhone 6S Plus.
The suction cups have to be near the home button (at the bottom) as shown on pictures .

Step 5
Then lift the display assembly to a 90° angle.
With a cruciform screwdriver, remove the five screws circled in red.

Step 6
Use tweezers to remove the display assembly connector bracket.

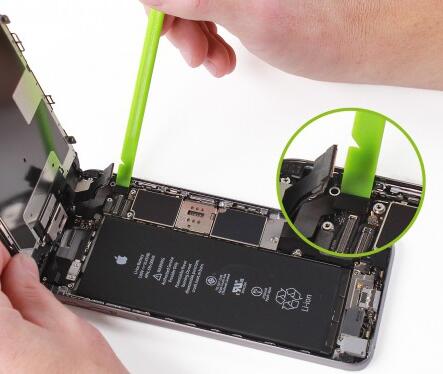
Step 7
With a nylon spudger, gently pry to disconnect the following cables:
- Front camera
- Earpiece speaker
- Proximity and light sensor
- Touch screen/LCD screen
Step 8
You can lift the display assembly and remove it.
The display assembly of the iPhone 6S Plus is now disassembled.
Step 9
Use a cruciform screwdriver and remove the three screws circled in red.
Those screws maintain the earpiece speaker bracket.

Step 10
With the nylon spudger, remove the front camera front its socket.
Grab the earpiece speaker and remove it with tweezers.
The earpiece speaker of your iPhone 6S Plus is now disassembled.

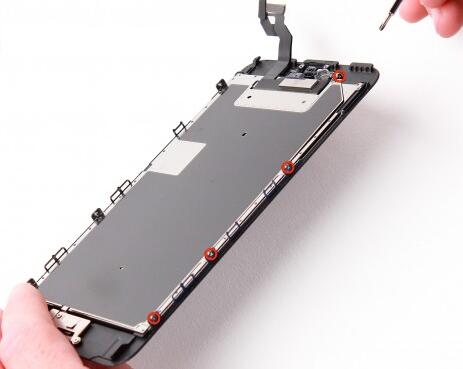
Step 11
Use the cruciform screwdriver and remove the four screws circled in red (picture 1) as well as the three screws circled in red (picture 2) holding the LCD shield plate. remove the two screws circled in red holding the home button bracket.
Step 12
Use a pair of tweezers to grab and remove the home button bracket.
Use a nylon spudger to pry and unclip the LCD shield plate.
Remove it.
The LCD shield plate of your iPhone 6S Plus is now disassembled.


Step 13
With a nylon spudger, disconnect the home button cable.
Then peel off the home button cable with a spudger.
Careful, the home button cable is very fragile, you have to be meticulous.
Make sure your put back the original Touch ID, otherwise for safety reasons, the Touch ID will not work again.

Step 14
Grab the home button,Use the tweezers to take off the home button assembly.

Step 15
The LCD screen of your iPhone 6S Plus is now disassembled.

You can replace your broken LCD screen by a new one. and Repeat the steps above step by step.
If you can do this without problem, maybe you also can replace iPhone Battery, small camera, charger flex and so on.
Any question, you also can ask us, we will reply you ASAP.